




Access Denied
IMPORTANT! If you’re a store owner, please make sure you have Customer accounts enabled in your Store Admin, as you have customer based locks set up with EasyLockdown app. Enable Customer Accounts
How to Make a Beaded Wristlet Keychain: Step-by-Step Guide
Publié par AccswholesaleBlog
on

To make a beaded wristlet keychain, choose beads with holes that fit your cord, measure a loop large enough to pass over your hand, arrange the bead pattern, secure a sturdy key ring to the cord, string the beads, and close the loop with a reliable knot or connector. Use strong, low-stretch braided nylon or polyester cord for a wristlet intended to carry everyday keys. Test the finished loop, knot, and hardware before use. The exact threading sequence depends on whether your key ring has a suitable closed attachment point and whether your beads can accept one or two cord strands.
A beginner can make a straightforward version with round silicone beads, durable cord, a split key ring or appropriate clasp, scissors, a ruler, and a cord-compatible finishing method. First measure around the widest part of your hand rather than copying an arbitrary bracelet size. Make a loose test loop, then adjust the number of beads and the cord length before tying the final closure. A wristlet should fit over your hand without needing to stretch a non-elastic cord.
Key Takeaways
- Choose a cord-and-ring construction before choosing a bead pattern; a keychain should not rely on decorative beads to hold the keys.
- Measure around your hand's widest part so the completed loop slips on comfortably; test the fit before trimming cord.
- Use compatible holes and cord thickness. A bead that fits one cord strand might not fit two.
- Silicone is comfortable and relatively light; acrylic offers color and shape variety; wood gives a different natural appearance. Check each bead's bore and finish.
- Make a sample before preparing multiple gifts or products for sale, checking every knot, ring, and attachment.
- If you want ready-made inventory rather than a DIY project, compare finished wristlet quality, assortments, order quantities, and total landed costs.
What Do You Need to Make a Beaded Wristlet Keychain?
The essential materials are beads, durable cord, an appropriate key ring or keychain connector, and basic measuring and cutting tools. The safest starting point is to decide how the cord will attach to the hardware, then purchase beads with holes that accommodate that construction. Selecting attractive beads first and discovering later that the cord does not fit through them is a common avoidable problem.
Beads: size, hole, and surface
Round silicone beads create the familiar soft, chunky wristlet style. A mix of round and flatter spacer beads produces a pattern similar to many ready-made silicone wristlets. Acrylic pony beads or larger acrylic shapes can also work if their holes and edges suit the cord. Wooden beads offer a warm neutral look, but inspect for rough hole edges that might abrade the cord. Glass beads may be attractive yet heavier and more vulnerable to impact, so consider their combined weight before making an everyday key holder.
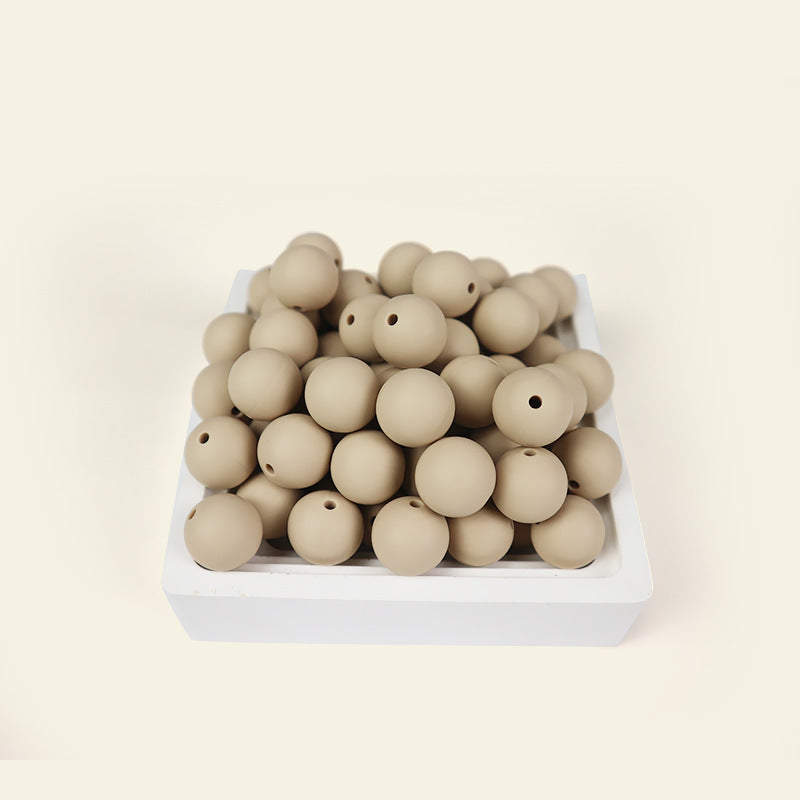
A practical starting point is a set of beads of one known diameter, with spacers as an optional addition. A bead's outside diameter does not tell you its bore diameter. Confirm the hole size separately; test the exact cord through one sample bead before designing the entire loop. A 15 mm silicone bead is one possible material choice, not a mandatory specification for every wristlet.
For a real material reference, AccsWholesale lists 15 mm silicone beads for DIY projects. The official listing describes silicone beads sold in 100-piece color variants. That listing is for loose beads, not a complete wristlet kit; cord and an appropriate connector must be sourced separately.
Cord: strength and compatibility
Choose a strong, low-stretch braided nylon or polyester cord that suits your beads and knot. Thin elastic bracelet string is convenient for a simple decorative bracelet, but it can stretch under hanging keys and may fail with repeated pulling. If you choose an elastic construction for a decorative lightweight project, treat its durability and load capacity differently from a practical everyday key wristlet.
There is no universal cord length or thickness that works for every pattern. Length depends on the measured hand opening, beads, attachment style, knot tails, and whether the cord doubles through the beads. For planning, cut more than the bare circumference: leave enough cord for the chosen hardware connection and a properly finished knot. If using a doubled design, test whether two strands will pass through the bead bores without being forced.
Key ring, clasp, and other tools
A split key ring provides a place to attach keys. Some designs use a separate lobster or swivel clasp so the wristlet can detach from a bag or key bundle. The cord-to-hardware connection must be deliberate and mechanically secure; simply placing a loose ring beside a closed bead bracelet does not create a reliable keychain attachment.
Gather scissors, a soft measuring tape or ruler, a bead tray or towel to prevent rolling, and a suitable aid for threading if needed. Jewelry pliers are optional if the selected connector has a jump ring requiring careful opening and closing. A compatible adhesive may support a manufacturer's recommended knot, but glue should not be treated as a substitute for a sound knot or mechanical connector. Follow product-specific curing directions and avoid flame-based finishing unless the material manufacturer expressly permits it and suitable precautions are in place.
How to Make a Beaded Wristlet Keychain: 7 Steps
This tutorial uses a continuous non-stretch cord loop attached to keychain hardware. The steps describe a practical sequence for a cord-based wristlet, not the separate metal rod method used for beadable keychain blanks. Work with one trial piece first; do not promise durability before testing the actual materials.
Step 1: Measure the opening over your hand
Bring your fingers together as you would when slipping on a bracelet. Measure around the widest part of your hand, including the thumb area that the wristlet must pass over. The resulting minimum opening matters more than wrist circumference alone. Add a little ease for comfort; a non-stretch loop that fits the wrist but cannot slide over the hand is not usable. Make a temporary cord loop and try it on before adding beads.
If the wristlet is a gift, obtain the recipient's hand measurement when possible. A typical adult-size estimate is less dependable than a direct measurement because hand width varies. Remember that bulky round beads occupy physical space on the inside of a loop, so a circumference measured along the cord may feel smaller when worn.
Step 2: Plan the pattern on a flat surface
Lay out beads in the intended order before threading. A beginner can alternate a large round bead with one small spacer, repeat two coordinated colors, or arrange matching halves around a central decorative bead. Build the pattern into a loop on the table and compare it with the trial size. If adding letters, orient each letter as you thread so the finished text reads in the intended direction.
Do not count beads from a product photo and assume the number will fit you. The count changes with bead diameter, spacer width, hole orientation, and intended opening. A dry layout also helps catch any cracked beads or rough bores before they are trapped inside the finished piece.
Step 3: Prepare the cord and confirm fit
Cut enough cord for the bead path plus a generous handling allowance for attachments and knot tails. Instead of using one rigid cut-length instruction for all constructions, measure the needed loop first and account for the planned knot or doubled section. Protect one end from fraying using a threading aid appropriate to the cord. Feed a short test length through your largest and smallest bead holes; if you need to double the strands, test both together.
Inspect the cord for frays, weak spots, or flattening. Replace a visibly damaged cord rather than hiding the defect under beads. Use a work surface where dropped beads will not roll away.
Step 4: Anchor the loop to the correct hardware
Make the key-holding connection part of the cord path before closing the wristlet. For a closed metal ring, pass the cord through the ring or through a purpose-made secure connector according to your chosen configuration. If your design calls for both cord ends to return toward the ring, check that the joining method holds the cord without slipping and will not load the knot at an awkward angle.
A lark's head hitch can anchor folded cord to a compatible solid ring, but it creates a doubled-cord arrangement and will not work with beads whose holes are too small for two strands. In that case choose a different verified construction instead of forcing oversized cord through the holes. Any intermediate jump ring must be closed correctly with appropriate tools, and a decorative open connector should not be mistaken for a structural one.
Step 5: Thread and shape the beads
String the beads in the planned order. Periodically bend the strand into its final loop rather than stretching it straight across a desk. Keep enough slack for comfortable movement without leaving a large exposed gap of cord between beads. Where alternating spacers and round beads, maintain the same sequence around the loop unless the intended design is asymmetric.
For silicone beads, check that bead friction does not create the illusion of a secure connection while the final knot is still untied. If threading stops abruptly, examine the hole rather than pulling hard enough to damage the cord. If the pattern is too short to fit over your hand, add beads or adjust spacing before tying. If too long, remove beads and rebuild the loop.
Step 6: Secure the closure
Bring the strand ends together according to the cord manufacturer's recommended knot or connector method. For an appropriate cord-based loop, a properly dressed, tightened, and tested secure knot may be used; some cords need a different finishing system or mechanical fitting. Avoid declaring that any particular simple knot is universally strong enough for all nylon, polyester, or elastic cords.
Tighten the closure gradually, inspect it from all sides, and make sure the keyring attachment is not pulling the knot open. If using compatible jewelry adhesive as additional insurance, follow its instructions and wait for full curing before any load test. Keep sufficient knot tails until the fit and strength check is complete; trimming flush too early can make a slipping knot impossible to correct.
Step 7: Test the wristlet before using it
Put the wristlet on and off gently. Check that beads do not pinch the hand, the ring moves correctly, and the connection does not gap when the key bundle hangs normally. Apply a controlled manual tug to the cord, knot, and hardware; inspect for slipping, opening, or fraying. If a connection fails, remake it with the right components rather than relying on more glue.
A DIY wristlet is not safety equipment. Keep loose beads away from young children because they can be choking hazards.

How Many Beads and What Size Should You Use?
The correct bead count follows from the opening you need and the space each bead occupies along the cord. A loop made of 15 mm round beads will need fewer main beads than one made from 8 mm beads, but spacers change the count again. Do not equate the bead's listed outside diameter with its exact usable spacing: compressed silicone, bead shapes, and bead orientation can all affect the assembled circumference.
For a planning-only example, imagine a loop that needs about 240 mm of bead-path length and uses 15 mm round beads with no spacers. Dividing 240 by 15 suggests roughly 16 beads as a first layout estimate, not a guaranteed final count. If you add 3 mm spacers between each main bead, the same 16 large beads plus 16 spacers would occupy roughly 288 mm before assembly adjustments. This is why the trial loop and physical try-on take precedence over formulas.
Wristlet loop versus ordinary bracelet
An ordinary fitted bracelet may sit close around the wrist; a non-stretch key wristlet normally needs to slide over the widest part of the hand. This difference explains why using a standard bracelet circumference without testing the hand opening can produce a wristlet that is too small. Likewise, an overly large loop may fall from the wrist while moving around a shop or carrying groceries.

Which Material Is Best: Silicone, Acrylic, or Wood?
Silicone is a natural first choice for a soft, chunky wristlet; acrylic offers colorful shapes; wood fits neutral designs. None is universally strongest as a completed keychain because cord, knot, and hardware may determine failure more than bead material. Choose the material based on feel, weight, hole quality, and the intended design rather than a single trend claim.
| Material | Design advantage | What to check | Good use |
|---|---|---|---|
| Silicone | Soft-touch, rounded beads in coordinated colors | Hole fit, surface condition, cleanliness | Everyday-style chunky wristlets |
| Acrylic | Bright color and novelty shapes | Sharp edges, brittle or cracked holes, weight | Personalized or playful designs |
| Wood | Warm, natural appearance | Splinters, unfinished bores, finish wear | Neutral and handmade-style gifts |
| Glass | Reflective decorative finish | Increased weight, breakage, impact resistance | Lightweight decorative accents only |
AccsWholesale's wholesale silicone bead wrist keychain is a useful example of how spherical beads and flatter spacers can create a consistent finished shape with a metal ring and clasp. It is a finished product example, not a set of loose materials for this tutorial. Product pages and photographs cannot establish the exact hidden cord diameter, knot or load rating without additional manufacturing evidence.

Beaded Wristlet Keychain Patterns and Design Ideas
Begin with one consistent repeating pattern before trying complex personalization. Coordinated colors make accidental pattern reversals easier to notice. These design examples are suggestions, not claims that a particular combination is a current best seller.
Two-color alternating pattern
Choose two silicone bead colors and repeat A–B–A–B around the loop. If using small separator beads, alternate them consistently between the main beads. This design is easy to adjust because a pair can be added or removed while keeping the overall sequence balanced. Try cream and blush for a soft effect, or black and white for contrast.
Pastel bracelet-style wristlet
Combine light pink, lavender, or pale blue beads with small coordinating spacers. Check how the colors appear in ordinary light and keep the key ring finish consistent where practical. A pastel design can suit gifting without needing names, logos, or licensed characters. Take a clear photograph against a plain background if the completed piece will be listed online.
Personalized name and letter beads
Place short initials or a brief name where it can be read without twisting the wristlet awkwardly. Check every letter's direction before tying. A personalized wristlet may need a different bead count to preserve fit, so do not squeeze in lettering at the expense of the minimum hand opening. Use only original artwork or permitted marks when selling personalized products.

Common Mistakes When Making a Beaded Wristlet Keychain
The most important errors involve sizing and attachment strength, not color selection. Correct these while the piece is still a trial sample.
Mistake 1: Using a fitted bracelet measurement
A wristlet with a non-stretch loop has to cross the hand. Measuring the narrowest part of the wrist alone can make an attractive but unusable loop. Fix this by measuring the actual hand opening and test-fitting before the final knot.
Mistake 2: Choosing beads before checking the cord
Large beads do not always have large holes. When a doubled cord is part of the construction, even a bead that fits a single strand can become incompatible. Fix this by buying or testing one representative bead with the intended cord and connector arrangement.
Mistake 3: Connecting hardware after sealing an incompatible loop
Not every solid key ring can be attached securely to an already finished closed bead bracelet. Some constructions require the hardware to be on the cord before the closure is tied. Fix this by planning the connector pathway first and by choosing a purpose-designed fitting where needed.
Mistake 4: Treating glue as the only reinforcement
An adhesive may be unsuitable for a specific cord, or may not cure well on the chosen surface. Fix this by following the cord or fitting manufacturer's instructions, securing the mechanical connection, and allowing any approved adhesive to cure fully.
Mistake 5: Ignoring weight and wear
Heavy keys, glass beads, and sharp-edged hardware add stress. Check all attachment points periodically, especially when the wristlet is used daily. Replace worn cord or an opening ring as soon as you see evidence of failure. A visually intact bracelet is not proof that its connector is still safe.
Should You Make Wristlet Keychains or Buy Them Ready-Made?
Make a wristlet yourself when customization and a small personal project matter most; buy finished wristlets when you need repeatable stock without assembly labor. DIY allows control over colors and bead arrangements, but requires cord sourcing, assembly time, testing, and potential remakes. Finished items save assembly steps but should still be checked for fit, hardware quality, and the consistency of received colors.
| Decision | Make your own | Buy finished wristlets |
|---|---|---|
| Main benefit | Customize patterns and lettering | Reduce individual assembly work |
| Main effort | Source materials, assemble and test | Compare listings, inspect samples, manage stock |
| Design variety | Limited by materials and time | Limited by current catalog assortment |
| Cost to compare | Beads + cord + hardware + labor + waste | Item price + shipping + fees + returns |
| Best starting point | One trial prototype | Small test assortment where available |
For a small seller, the meaningful comparison is the fully loaded cost per usable wristlet, not bead cost alone. A handmade product's cost includes the beads actually used, the share of cord and hardware consumed, packaging, damaged components, and labor. Purchased finished stock has freight and any relevant taxes or import charges. Either approach can become expensive if several slow-selling colors are ordered before demand is known.
A simple cost comparison
Suppose the hypothetical cost of beads used in one wristlet is $1.40, the cord and hardware cost $0.70, packaging is $0.30, and paid labor takes 15 minutes at $16 per hour. Labor would be $4.00, making the estimated total $6.40 before selling fees, overhead, and discarded materials. These are illustrative assumptions, not verified AccsWholesale component prices or a market selling-price claim. Recalculate with your own receipts and assembly time.
If you are buying for resale, wholesale wristlet keychains provide a direct way to compare ready-made designs. AccsWholesale's published finished wristlet and loose silicone bead listings can inform your make-versus-buy decision, but do not assume that buying a bag of beads also supplies cord, clasps, or a complete wristlet kit. Confirm current minimum quantities, pack units, availability, and total delivered cost for each particular listing before ordering.
Frequently Asked Questions
What do you need to make a wristlet keychain?
You need beads that fit the chosen cord, sturdy cord, a secure key ring or appropriate keychain fitting, scissors, and a measuring tape. A threading aid, pliers, and a compatible knot-sealing method may be useful for particular constructions. Test the cord through the beads before committing to a design.
How do you make a simple beaded keychain?
For a small dangling keychain rather than a wristlet, secure one end of an appropriate cord to suitable keychain hardware, add beads, and finish the free end with a knot or fitting suitable for the cord. A wristlet instead requires a closed, wearable loop that comfortably slides over the hand. Both need tested attachments.
What material is used for a wristlet keychain?
Wristlet keychains may combine silicone, acrylic, wood, fabric or other decorative materials with nylon or polyester cord and metal hardware. For chunky beaded versions, silicone round beads are a common design choice. The hardware and cord should be selected for the intended everyday use rather than just visual appearance.
What materials do I need to make a beaded keychain?
A basic beaded keychain uses beads, a beading cord or suitable wire, a split ring or clasp, and tools for the chosen attachment system. For a wearable beaded wristlet, add accurate hand-opening measurements and a closure that holds under normal key use. Decorative elastic bracelets require a different durability assessment.
Can I make a silicone bead wristlet keychain with a tassel?
Yes, a tassel can be attached to compatible hardware as a decorative accent. Plan where it hangs so it does not snag the cord or obstruct the clasp, and inspect the connecting ring. Do not use a tassel attachment as the sole structural connection for the keys.
Can I use fishing line or elastic string?
A particular fishing line or elastic product may work for a light decorative project, but neither is automatically the best cord for a key-holding wristlet. Choose based on its documented material, knot behavior, compatible beads, and load expectations. Low-stretch braided cord is generally a more practical starting point for an everyday key wristlet.
How can I tell whether my finished keychain will fit?
Test a temporary loop over the widest part of your hand before tightening the final closure. The loop should slide over without requiring the cord to stretch, then rest comfortably around the wrist. Consider the inward bulk of large beads as well as the cord-path circumference.
Are beadable metal keychain rods the same as wristlet connectors?
No. A straight metal beadable keychain blank typically holds beads along a rod and may support a hanging tassel; it does not automatically form a wearable cord loop. Use hardware designed for the construction you are making and do not substitute a rod blank for a wristlet connector without a separately tested design.
Where can I buy beaded wristlet keychains wholesale for resale?
Compare finished wristlet assortments from wholesale accessory suppliers and marketplaces, looking at bead material, usable wrist opening, clasp construction, current quantities, pack pricing, and delivered cost. AccsWholesale lists ready-made silicone wrist keychains and offers a wholesale wristlet keychains collection for comparing available styles. It is a resale sourcing route, not a substitute for instructions on making one yourself.
Final Answer: What Is the Easiest Way to Make a Beaded Wristlet Keychain?
Start with a simple silicone bead pattern, a durable cord that fits the holes, and a key ring or purpose-made connection that suits a closed wristlet loop. Measure around the widest part of your hand, lay out beads to match the size, connect the cord to the hardware, string the pattern, finish the knot or connector according to the cord's instructions, and test all joins before carrying keys. The essential difference between a bead bracelet and a useful wristlet keychain is secure hardware attachment plus sufficient space to slide over the hand.
If you want to repeat the project for gifts or a small product line, make one trial piece and document its measured opening, bead count, cord type, connection method, and assembly time. If ready-made inventory better fits your plan, compare finished items by actual construction and delivered unit cost rather than treating a DIY material listing as a complete kit.
Compare Beaded Wristlet Styles and Materials
Explore available finished designs in the wholesale wristlet keychains collection, and check current bead assortments separately if you prefer to build your own. Review each product's listed material, pack quantity, hardware style, and delivered cost before deciding whether to make or buy.
Explore Wholesale Wristlet KeychainsRelated Posts

Are Italian Charm Bracelets Actually Italian? Origin vs. Made in Italy
Italian charm bracelets have genuine Italian roots, but the name does not guarantee that every bracelet is made in Italy....
En savoir plus
When Were Italian Charm Bracelets Popular? Y2K History & Timeline
Italian charm bracelets became especially popular in the late 1990s and early 2000s, building on the modular Composable bracelet introduced...
En savoir plusInvalid password
Enter